How To Sharpen Robot Lawnmower Blades with 3D Printed Sharpening Tool and Diamond Stones - For Mammotion Luba, Yuka and other robotic lawn mowers
- Mar 31
- 6 min read
Updated: Jun 11
The blades that come on robotic lawnmowers like the Mammotion LUBA and YUKA are different from the large blades on a traditional gas mower. Robot lawnmowers use small, thin razor-style blades and rely on their sharpness for cutting because the decks have much less power than a gas mower. A traditional-style mower needs a sharp blade, too, but its sheer power can cut and mulch grass even when the blade is a little dull. A robot lawnmower needs a razor-sharp blade to keep cutting well; otherwise, it will start tearing up the grass or not cut at all.
Replacement blades are affordable, but throwing away blades unnecessarily is wasteful if they can be resharpened several times before disposal. I've been using the original blades for 4 years in the Mammotion LUBA by simply taking a few minutes to resharpen them every few months of use.
I have spare sets that are already sharpened and swap them with the dull sets and then resharpen them on the workbench while the mower continues to cut grass.
To make sharpening easy, I designed a 3D printable holder that holds 2 blades. Both blades are sharpened simultaneously.
BLADE HOLDERS FOR SHARPENING AND HONING
WHERE TO DOWNLOAD 3D PRINT FILES
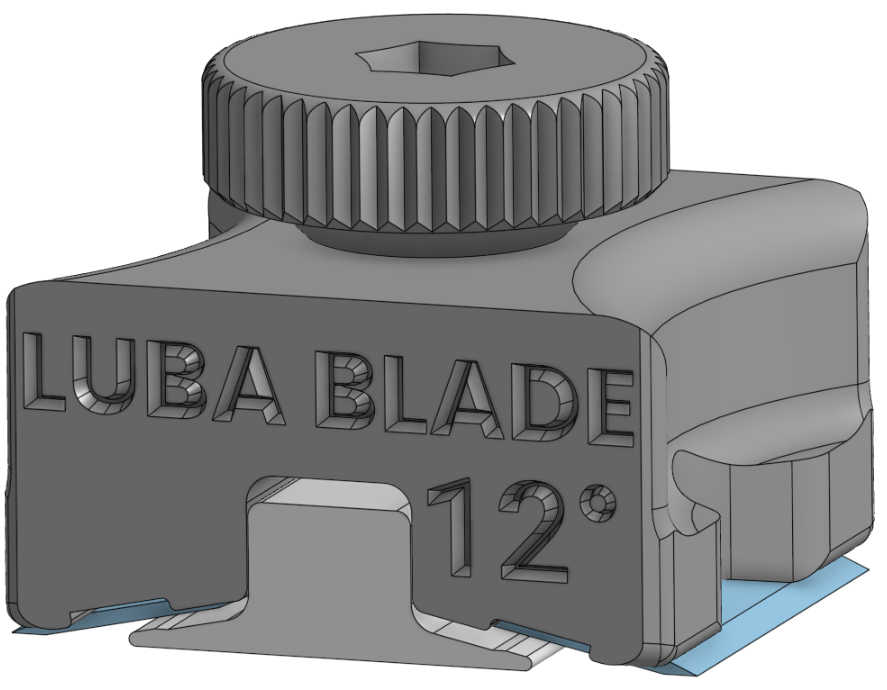
I prefer a dual bevel sharpening process (explained in further detail below), so I designed 2 holders:
12 degrees is the original angle of the Mammotion blades. This 12 degree holder is used for Step 1 of the sharpening process.
Sharpen the blades on a 600 grit diamond stone.
20 degrees is the honing angle. This 20 degree holder makes a very small bevel on the edge that is stronger and more durable than the 12 degree angle. It also makes the sharpening process faster, because there's less material to remove at 20 degrees vs 12 degrees.
Hone the blades on a 1200+ grit diamond stone.

This is what the blade edge should look like after this step. The 20-degree micro bevel can be seen as the bright, shiny part at the edge.

The underside of the blade holder with the blades installed:

Blades bening sharpened on a portable diamond sharpener. It's not as wide as the blades, but it still works.

Blades being sharpened on a large diamond plate. This works a lot better. Wet the plate to allow the particles to clean off better and speed up the sharpening.

HOW TO ASSEMBLE THE BLADE HOLDERS
HARDWARE:
You will need the following hardware:
10-32 x 1.25in Flat Head Screw
10-32 Nut
8-32 hardware will also work, but will be loose.
ASSEMBLY:
This exploded view shows how the parts come together.

How to insert the blades:

SHARPENING STONES
Large, flat diamond sharpening stones are the best to use for sharpening these blades. There are cheap ones that are ok, and expensive ones that are excellent.
I recommend buying at least these 2 grits of stones.
600 grit - for sharpening at 12 degrees
1200 grit - for honing at 20 degrees
CHEAPEST DIAMOND SHARPENING STONES
If this is all you're planning to use the diamond stones for, then buy a cheap set like these. This is a double sided stone with 600 grit on one side and 1200 grit on the other. Don't expect this to last as long as the nicer stones, but it's probably good enough for casual use.
WHERE TO BUY:

GOOD DIAMOND SHARPENING STONES
These are good-quality stones for general-purpose use. Made in USA surprisingly.
WHERE TO BUY:


BEST DIAMOND SHARPENING STONES
If you want a good set of diamond stones for sharpening other things like kitchen knives and pocket knives, then I can highly recommend these Ultra Sharp stones, as they are what I use.
WHERE TO BUY:

LEATHER STROP
A leather strop is used for the finishing step to remove the burr and polish the blade. This is the strop that I use.
WHERE TO BUY:

SHARPENING STEPS:
NOTE: The stock blades arrive sharpened on 2 edges. This makes them easy to install, because it doesn't matter which direction you install them on the mower deck. However, don't assume that it gives you more cutting edges. My experience is that by the time the cutting edge is full, the other edge is also full due to wear. Therefore I pick the best edge and only sharpen that one edge, because sharpening the other edge is a waste of time.
The sharpening angle on a stock Mammotion blade is 12 degrees. The white holder is set to 12 degrees.
Use a 600 grit diamond stone to resharpen.


Sharpen on one side until enough material has been removed to start forming a fresh edge.
Loosen the holder and flip the blades.
Sharpen on the other side until a sharp edge begins to form.
Make sure that you sharpen evenly on both sides. Usually this is pretty quick, taking less than a minute per side. If the blade is damaged or severely dull it may take more time and material removal.
Once a reasonably sharp, clean edge is created, it's time to start honing on a finer diamond stone, like a 1200 grit.
Honing on 1200 grit stone can be done at the same 12 degrees angle, but will take longer due to the small amount of material removal. A faster method is to use the dual bevel or micro bevel sharpening technique.
Remove the blades and install them in the 20 degree 3D printed holder.
Hone the blades at 20 degrees on the 1200 grit diamond sharpening stone. Be careful to not over do it, as this will go very quick.


Loosen the holder, flip the blades and hone the other side at 20 degrees on 1200 grit.
A small, even edge should be visible at the top of the edge of the blade, as shown here.
Stop when it looks like the image below.

Use a leather strop with polishing compound, drag the blade backwards several times on both sides on it at about 20 degree angle to remove the burr and clean and polish the edge.
With practice, this process only takes a few minutes and blades aren't wasted.
WHY USE DUAL BEVEL FOR SHARPENING BLADES?
Dual bevel, micro bevel, dual angle, etc blade sharpening is a sharpening technique that makes it faster to sharpen a blade, and makes a stronger, more durable edge.
In this example (for kitchen knives), we begin by coarse sharpening at 15 degrees to create an edge. This sharpening only needs to be taken up to 600 grit. Then the blue lines are honed at 22 degrees using 1000+ grit. This creates a very small edge at a larger angle that is more durable than the narrower angle edge was. Since it is very small, it doesn't compromise the ease of cutting, because the main wedge effect is still at 15 degrees. Each consecutive honing removes material to the next set of blue lines. Eventually you're left with a large surface area 22 degree angle, which does make cutting less efficient due to the larger wedge angle and takes more time to remove material with the hone.

At that point it is time to resharpen to 15 degrees.

Then repeat the 22 degree honing steps again.

After honing, always use a strop to remove burr and clean and polish the edge. The strop should be used with an angle equal to or slightly less than the honing angle.
Affiliate Disclaimer
The products shown here were purchased by me with the intent to use them. I did not receive any free items, and I am not being paid or compensated for this review. The video, description, and comments may contain affiliate links. If you click on a link, I may receive a commission. Money earned helps to support my channel and bring you more informative videos about engineering, crafting, and DIY


Comments