How To Make The Best Worm Compost Bin | Super Easy, Inexpensive, Low Maintenance, Easy to Harvest Worm Poop Castings
- May 20
- 6 min read
Updated: Jun 11
Years ago I started a worm compost bin, which began a multi year experiment to create the best worm compost bin. I tried many different things and kept making improvements and simplifying it until it worked super well and required no maintenance.
There are worm bin products that can be purchased. They are often quite expensive for a bunch of plastic trays. The trays are shallow and don't hold much scraps or compost. They fill up quickly for a family of four.
I began the journey with a DIY version, the crate worm bin.
CRATE WORM BIN
This worm bin was made from stackable vegetable crates that are thrown out by restaurants and grocery stores. The ones I have are a little heavier-duty and were acquired for free from a nursery.
The idea was that since the crates could be stacked, once one crate filled up with scraps, another crate was set ontop and continued to be filled up. The worms could move upwards through the grates of the crates.
The sides of the crates had to be covered because the holes were too large to contain the compost or dirt. At first I used cut up foam mats for the sides, but the insulation was too much and retained too much heat in the bins. The bins would overheat in the summer, and the worms would flee for their lives. I changed the side covers to ground weed barrier cloth and hot-glued it in place. That worked well to keep the temperature within an acceptable range most of the year, but it did get too cold in winter and killed the worms. The durability was also not very good.
At the bottom of the stack of crates was a large container to catch the liquid and a spout to pour it out. The bottom crate always had a weed barrier cloth under it to prevent the worms from falling into the liquid and drowning. However, worms still managed to get into the liquid. The liquid was kind of a mess to deal with. Not really worth messing with unless you are a retired gardener.
In general, this crate system worked pretty well. The lower crates turned into dense worm poo, but separating the worms out for harvesting was still a pain, because there would always be a lot of worms still in the bottom crates, even if there was no longer any food scraps there. Eventually, I gave up on separating worms and just used the worm castings with some worms in it.
Maintaining the crates was a hassle. They became very heavy, and most people would struggle with moving them. The crates should have been half the length to be more manageable.
It often became smelly, especially when the solder fly larvae got in there, which were impossible to keep out.
BUCKET WORM BIN
I tested a similar method to the crate worm bins using buckets with holes drilled in the bottom. The buckets were filled halfway with food scraps and then stacked with a new bucket with holes in the bottom.
This setup had similar issues to the crate worm bins. Temperature fluctuations were worse because the buckets had no ventilation to the sides, so they could get too hot and then the worms wanted to escape.
Also, the non ventilated buckets made it easier for the compost to get nasty.
Same issues with collecting the worm castings. It was difficult to seperate the remaining worms from the castings.
The stacking bucket worm bin worked ok, but still required a lot of maintenance, and had a tendency to overheat.
COMMERCIAL PRODUCT WORM BIN (Something premade that you can buy)
Commercial worm bins are advertised as working so well and being extremely easy to use and maintain. The reality of these is much different. They do work under ideal conditions. They need to be in a stable temperature location, so outdoors in the south is not great in the summer. I've heard of people having success keeping them in their climate controlled garage, but I don't want to do that. Their capacity is usually quite small. For a family of 4, the bins fill up quickly, faster than the scraps turn into worm castings. They require maintenance. There are things you can't add to the bins, like meet, citrus, etc.
These commercial worm bins are expensive.
If you are super careful with only feeding the worms approved veggies (which means that you need a second compost bin for non approved food), and maintain this style of worm bin, then it will work well and won't be smelly. It would be good for someone that doesn't have the yard space for a compost bin.
Ultimately these were too much maintenance for me. If you don't take regular care of it, things can get smelly, the worm population can crash, etc.
55 GALLON DRUM WORM BIN - THE BEST WORM COMPOST BIN SOLUTION!!!
This has been so successful that I haven't needed to make any further improvements related to the worms or compost. The only improvements needed are to the barrel stand and the ground that it sits on. This does require a space tucked away in the corner of the yard or garden. You don't want this right next to your patio.

I took a 55 Gallon plastic drum and cut out the top and the bottom. I elevated it about 6 inches off the ground on cement blocks at 3 points. I stocked it with some starter compost and the worms, pouring them in the top of the barrel. The compost piles up under the bottom opening of the barrel and eventually reaches a height that begins to fill the barrel.

The worms eat the food scraps and continuously move upwards as more food scraps are added. The worm castings are all that remain at the bottom below the opening of the barrel.
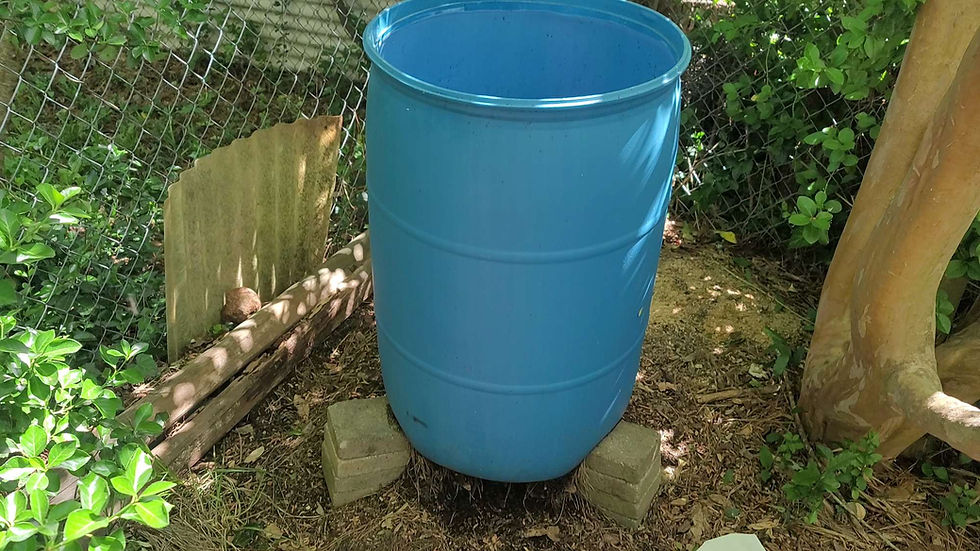
To harvest the worm castings, use a shovel to remove the castings around the edges, under the barrel. Gravity will feed more worm castings downwards.

It requires 0 maintenance and 0 additional work. Put compost in the top, harvest worm castings from the bottom. Very few, if any, worms are left at the bottom. There's a sufficiently large gradient that they all move upward. The top layer is always writhing with worms. It's been working for years. Haven't had to add any worms.

I'm not careful about what goes in the compost. I put everything in there, even things they say shouldn't go in worm bins. I don't have the time to deal with complexity. Just throw it all in. The worms seem to love it.
I don't use a cover. Rain goes inside, keeps it moist, and drains out the bottom. I do add a layer of ripped-up cardboard, shredded paper, or mulch over the fresh compost.
It's in the shade. It doesn't appear to get too hot for the worms. There's enough mass that the worms appear to live through winter just fine, granted we are in Zone 8 plant hardiness.
The weight of the compost has started to bend the plastic where it sits on the cement blocks. I knew that simply setting the barrel on top of cement blocks was never a great idea, and I wanted to add a metal ring with legs around the barrel, but I never got around to fabricating that. I saw that barrel leg kits are sold for making deer feeders, and they look like the exact thing I wanted to build to elevate the barrel above ground.
WHERE TO BUY:

The center area under the barrel is difficult to get compost out of because, as you dig towards the center, the worm-casting compost closer to the outside of the barrel will fall down. A cone under the barrel would divert the worm castings to the edges of the barrel, making it even easier to harvest.
Here's a poly funnel cone that could be flipped upside down and added under the barrel.
WHERE TO BUY:

I didn't put anything under the barrel on the ground. The compost falls down onto bare ground. Surrounding plants and trees grow roots into the compost and steal the nutrients. They also make a mat of roots that makes it more difficult to harvest the compost, because you need to break up the mat before collecting it. A barrier needs to go on top of the ground. A weed barrier could help to prevent roots from coming through.
BLENDING SCRAPS BEFORE COMPOSTING
The worms are slow eaters. If you have a lot of scraps, they will pile up faster than the worms can eat them.
I found that using a spare blender container as a countertop compost bin, mixing with some water and blending before putting in the compost broke everything down to where the worms could eat it much easier, faster and allowed the worm population to explode. The scraps turn into compost a lot faster. A heavy duty blender will break down everything, including chicken and ham bones.
Affiliate Disclaimer
The products shown here were purchased by me with the intent to use them. I did not receive any free items, and I am not being paid or compensated for this review. The video, description, and comments may contain affiliate links. If you click on a link, I may receive a commission. Money earned helps to support my channel and bring you more informative videos about engineering, crafting, and DIY


Comments