2002-2006 Mercedes Sprinter Van Maintenance and Repair - T1N Dodge, Freightliner
- Jan 15, 2024
- 11 min read
Updated: Jun 15
Table Of Contents
DIAGNOSTICS COMPUTER
TURBO RESONATOR REPLACEMENT
AUXILIARY ELECTRIC COOLANT PUMP
TRANSMISSION SERVICE - Every 60k miles
TRANSMISSION REPLACEMENT
SERPENTINE BELT IDLER PULLEYS - Every 100k miles
SERPENTINE BELT TENSIONER - Every 100k miles
REPLACE SERPENTINE BELT - Inspect Every Oil Change, Replace at 50-80k miles
REPLACE ENGINE AIR FILTER
REPLACE CABIN AIR FILTER
DIFFERENTIAL OIL CHANGE
COMMON OIL LEAK LOCATIONS
FUSES ATTACHED TO BATTERY
REPLACEMENT AIR VENT GRILL
DRIVE SHAFT BOOT REPLACEMENT
DRIVESHAFT SUPPORT ASSEMBLY
FRONT WHEEL BEARINGS
ABS ESP BRAKE PRESSURE SENSOR
COOLANT FLUSH - 15 years or 150,000 miles
REPLACING THE RADIATOR
DOOR LOCK ACTUATOR
CABIN FILTER INSULATION KIT
ARM REST REPAIR
BRAKE PEDAL RUBBER COVER REPLACEMENT
DIAGNOSTICS COMPUTER
I was lucky enough to acquire a DAD T1N Sprinter-specific diagnostic computer. It fulfills most of my code reading, code clearing, and diagnostic needs for repairs. Without it, I would be working blind.
DAD diagnostic for T1N
Xentry clone from china
BENZNINJA (Does this work for T1N Sprinter?) (Their website looks scammy, but they are supposedly super legit, and have extremely helpful customer service).
TURBO RESONATOR REPLACEMENT
The stock turbo resonator finally split open several years ago enough to start leaking oil. I replaced it with an aftermarket Dorman brand resonator that was recommended as a stronger alternative. What I missed though is that the o-ring that comes with the Dorman part is crap and will fail and leak within a few years, and that is exactly what happened. The Mercedes brand o-ring is said to be superior.
Good o-ring - Mercedes P/N 013 997 84 45
Someone measured the stock Mercedes o-ring 1.7" ID, 2.1" OD and 0.2" Width
Those measurements coincide with a #327 o-ring. Why not use a quad seal (X) o-ring? They offer superior sealing in many ways to a standard o ring.
The #327 quad seal VITON o-ring from Mcmaster was a perfect fit. It was tight going in, so put some engine oil on my o-ring before inserting. Viton is a good choice for this application, better than cheaper Buna-N. Viton has a temp resistance of 400F and resistant to a wide range of chemicals, including oils, fuels, ozone. Buna-N should still work ok for this application as it has good chemical and oil resistance, and 250F heat resistance. Viton is more expensive, but not an issue since this is only one o-ring.
Chemical-Resistant Viton® Fluoroelastomer O-Ring, X-Profile, 3/16 Fractional Width, Dash Number 327


AUXILIARY ELECTRIC COOLANT PUMP


Since the connector is different, and I cannot find a mating connector for the old pump, I may hack the connector part off the old pump, and solder that to the wire leads that come with the new connector.
FUEL LEAKING FROM HOSES AT HIGH-PRESSURE FUEL PUMP
There are 2 very short hoses attached to the high-pressure fuel pump. Mine were leaking diesel fuel onto the motor, quite a bit at some point. Squeezing the stock crimped on hose clamps temporarily stopped the leak, but I knew that these hoses would need to be replaced.
13-15mm fuel injection style hose clamps are needed to replace the crimped-on hose clamps that aren't reusable.
WHERE TO BUY

TRANSMISSION SERVICE - Every 60k miles
The transmission will last longer if the fluid and filters are changed every 40-60k miles or so. The original T1N MB NAG1 transmission service interval was once at 80,000 miles and done. Of course that proved to be very optimistic.
I buy the kits from EuroParts-SD.com either the FUCHS OEM fluid or the PENTOSIN fluid (which is supposedly newer tech and better...)
The kits come with the replacement gasket and filter.


Something else that needs to be serviced occasionally is the transmission electrical connector. It is prone to leaking, although the newer revisions are improved over the older leaky ones.

Replacing Transmission Adapter Plug
Using a stubby 1/4" drive wrench w/7mm socket- only about 22 in./lbs.
Transmission Fluid Service Instructions
Required Tools:
Mercedes Transmission dipstick (does not come with the van)
4mm allen wrench (for 2006 torque converter drain bolt) or 5mm fallen wrench (for 2004 torque converter drain bolt)
5mm allen wrench for pan drain bolt.
27mm socket, with 1 inch (1/4") extension, and a socket wrench with a pivoting head
T30 torx bit (for transmission pan)
8 to 9 quarts of ATF fluid (service manual recommends 7.7 liters for a full drain and fill).
Torque Specs
130 in/lbs torque converter drain bolt
177 in/lbs trans drain bolt
22in/lbs 7mm captive bolt electrical connector
71in/lbs 6 trans pan bolts
71 in/lbs 10 valve body bolt
71 in/lbs 3 solenoid retaining clip bolts
Remove the plastic cover under the torque converter.
Use the 27mm socket to turn the engine crankshaft bolt clockwise only (do not turn counterclockwise) until the torque converter drain bolt is visible and lined up with the center of the hole.
Remove the transmission fluid drain bolt and allow to drain.
Remove the transmission pan bolts and drop the pan.
Bolts Oil pan NM 8 inch lbs 71
Plug oil pan” 20nm 177 inch lbs
From the 2006 service manual:
(41) Install electrohydraulic unit (2). Tighten the bolts to 8 N·m (71 in.lbs.).
(42) Install oil filter (4) (Fig. 62).
(43) Install oil pan (5) (Fig. 62). Tighten the bolts to 8 N·m (71 in.lbs.).
(44) Install guide bushing (12) (Fig. 62).

TRANSMISSION REPLACEMENT
SERPENTINE BELT IDLER PULLEYS - Every 100k miles
The serpentine belt idler pulleys (bearings) will eventually wear out. For me that seems to be about 100k miles (which is also the recommended replacement interval). They start to make a racket when it's cold in winter. If the tensioner idler pulley needs to be replaced before 100k miles, the pulley can be replaced without replacing the whole tensioner. However, if the tensioner has 100k miles on it, it should also be replaced. If the tensioner starts to fail, it can result in engine overheating, broken belt and other problems.
The OEM setup uses one grooved and one smooth pulley. Europarts-SD recommends using 2 grooved pulleys.
Buy 2 of these pulleys.
Part Number: 000 202 09 19

This is the serpentine belt tensioner pulley. Buy 1 of these. This pulley does not come with a dust cover, nor do the original dust covers work. The packaging says that a dust cover is not needed, because the bearings are sealed and greased. In my experience, a dust cover will increase the lifespan of a "sealed" bearing.

Part Number: 38018 TENSIONER PULLEY

All the idler pulleys use a T50 torx bolt. The Idler pulley bolt torque spec is 26ftlb. The small clearance between this bolt and the fan blades makes them difficult to access with a regular socket wrench and T50 torx socket. Using a low profile 1/4in bit wrench with a T50 torx 1/4in bit made it easy to remove and install these bolts. I used this Gearwrench 1/4 bit ratchet driver set. The 12 in long ratchet made it easy to access the bolts and loosen/tighten them.

These are the T50 Torx bits I used with the 1/4in bit ratchet set:
Mayhew Tools 18802-5 USA Torx Insert Bit, T50 x 1", 5-Pack
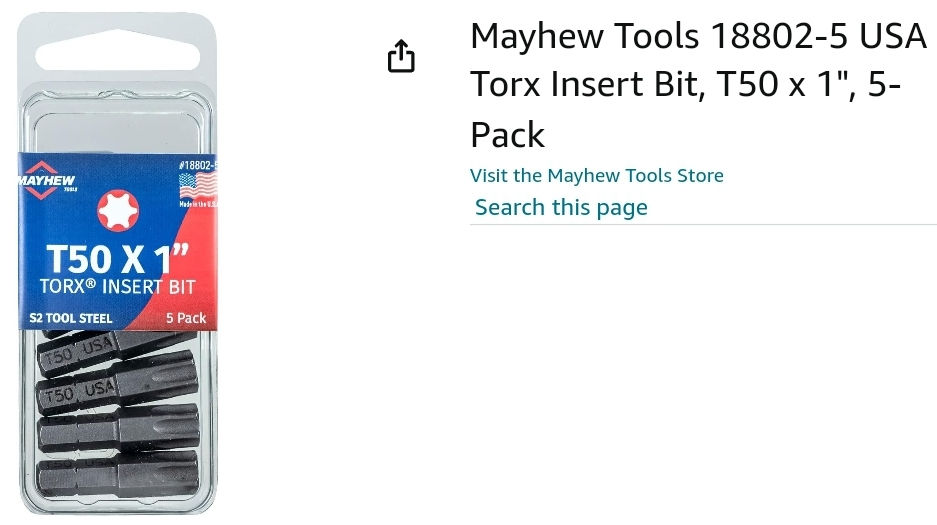
Or:
Insert 1" Torx 50 (T50) / Star Power Impact Bit 10 pack 1/4 Hex

SERPENTINE BELT TENSIONER - Every 100k miles
If the tensioner has 100k miles on it, it should also be replaced. If the tensioner starts to fail, it can result in engine overheating, broken belt and other problems.

The serpentine belt tensioner bolts to the motor are torqued to 22 lbft.
REPLACE SERPENTINE BELT - Inspect Every Oil Change, Replace at 50-80k miles
The last serpentine belt I used was a Continental Elite (Rebranded Goodyear Gatorback), but this belt only last 30-40k miles before it started splitting along the grooves. It's as if the pulleys were slicing into the part of the belt above the grooves. When I looked at replacing it, they don't appear to manufacture the "Gatorback" belts anymore. The same Continental part number brought up a plain belt of the same size.
There's a lot of discussion about the correct length belt. The factory length is 2257mm or 2260mm (depending on who you all 😂). 2257mm corresponds to 88.7in which is a Continental 4060887. I have previously used this length, and it works well. There's no equivalent to the 2260mm. The next inch size up is Continental 4060889, which is 2258mm. This one is also a perfect fit. I used this length on the most recent belt replacement.
WHERE TO BUY:

REPLACE ENGINE AIR FILTER
I've been using the HENGST engine air filters, and all has worked well so far.
Part Number: 003 094 83 04-HENGST

REPLACE CABIN AIR FILTER
I use the HENGST cabin air filter. So far so good.
Part Number: 901 830 04 18-HENGST

DIFFERENTIAL OIL CHANGE
Order two one liter bottles, if doing a drain and replacement of fluid for 2500 models.
Order three one liter bottles, if doing a drain and replacement of fluid for 3500 models.
COMMON OIL LEAK LOCATIONS
OIL LEAKING FROM UNDER ENGINE COVER
OIL LEAKING FROM THE TURBO OIL FEED LINE OR TURBO OIL RETURN LINE
If oil is leaking from the left side of the engine (facing the front of the van, turbo side), it's most likely coming from the turbo oil feed line or the turbo oil return line. My van had a dripping leak midway up the left side of the engine, and it was leaking from the connection of the turbo oil feed line at the engine block.
Oil supply line o-ring replacement.
Replacing the o-ring on the oil feed tube to engine connection is relatively straightforward and can be done from the top of the engine.
Turbocharger Oil Feed Tube Seal Ring 2002-2006 5 CYL & 2014-2016 2.1L 4 CYL
Part Number: 023 997 85 48
Oil return line seal replacement.
How to replace gaskets on both the oil supply and oil return line.
The 2006 service manual (page 11 - 8) says:
(1) Clean all mating surfaces
(2) Install turbocharger to exhaust manifold. Tighten bolts to 22 lbs. ft. (20 N·m) (Fig. 6).
(3) Install turbocharger support bracket. Tighten bolts to 177 lbs. in. (20 N·m) at engine and 22 lbs. ft. (30 N·m) at turbocharger (Fig. 6).
(4) Replace gaskets and install oil return line at turbocharger. Tighten bolt to 80 lbs. in. (9 N·m) (Fig. 6).
(5) Replace gaskets and install oil supply line at turbocharger. Tighten bolt to 160 lbs. in. (18 N·m)(Fig. 6).
(6) Attach turbocharger vacuum line to vacuum unit (Fig. 6).
(7) Attach air intake and charge air hoses (Fig. 6).
(8) Connect front exhaust pipe to turbocharger. Tighten flange clamp to 22 lbs.ft. (30 N·m) (Fig. 6).
(9) Install heat shield (Fig. 6).
(10) Connect negative battery cable
Fig 6:

FUSES ATTACHED TO BATTERY
There's a small fuse box attached to the battery with several high current fuses. The type of fuse used here is a MIDI fuse. The bolt hole distance is 30mm. I haven't had any of these fuses blow, but it's a good idea to have some on hand in case I do something stupid, and there's one empty slot that I intend to use for the starter battery ch
WHERE TO BUY

REPLACEMENT AIR VENT GRILL
DRIVE SHAFT BOOT REPLACEMENT
The boot's Dodge/Mopar part number is 05133897AA , its MB number is A 901 411 00 97
Good info on this post (#9) about how to replace the drive shaft boot https://sprinter-source.com/forums/index.php?threads/59458/
It's hard to find the driveshaft boot in stock somewhere.
Europarts SD only offers this kit with the bearing support that includes the driveshaft boot.

DRIVESHAFT SUPPORT ASSEMBLY
Good info about replacement - https://sprinter-source.com/forums/index.php?threads/20292/
In order to replace the driveshaft support assembly, you're going to need a bearing puller. They use this bearing puller in the above thread: https://www.harborfreight.com/bearing-separator-and-puller-set-62593.html
FRONT WHEEL BEARINGS
Info about replacing front wheel bearings
ABS ESP BRAKE PRESSURE SENSOR
All the lights related to the braking system and ABS came on in the dash. Using the scan tool, it came up with code:
C1501 ESP brake pressure sensor BAS diaphragm travel sensor
This error indicates that something is wrong with the ABS ESP brake pressure sensor
COOLANT FLUSH - 15 years or 150,000 miles or when something needs to be replaced

REPLACING THE RADIATOR
The radiator has
DOOR LOCK ACTUATOR
I replaced the passenger door lock actuator in July 2022 with an aftermarket actuator. It worked for exactly one year before failing in July 2023. Since I was in a road trip, I couldn't get a replacement part. I took it apart and found that the output nut got jammed when it retracted. Adding a spacer washer fixed the issue, and I was able to glue the housing back together and reasonable the door with a working actuator that ended up lasting for almost another year when it started working intermittently and failed in June 2024.
Lesson learned, only buy the OEM part unless the internet says otherwise. When I saw the price of close to $300, I found out why I had bought the aftermarket actuator for $50. However, it was a mistake that cost me in the end. I found a bit better price ~$200 for the OEM actuator and replaced it.
CABIN FILTER INSULATION KIT
Foam insulation cover for blower motor and cabin filter housing directly under windshield/cowl in engine compartment. Often falls apart with age.
ARM REST REPAIR
The arm rest is worn and foam is showing.
It was recommended to use this cover as a starting point, and stretch/glue it in place.
Where to buy:

BRAKE PEDAL RUBBER COVER REPLACEMENT
The rubber cover for the brake pedal was severely worn such that the metal was exposed. The replacement cover is available, and easy to replace, but tricky to install.

STEERING - TIGHTEN AND REMOVE PLAY
Replacing the lower steering column u joint.
WHEEL LUG BOLTS
For the aftermarket aluminum wheels that were installed on the van, the lug bolts used by the installer were a little too short. I think that the aftermarket wheels have a wider offset than the Mercedes aluminum wheels.
I ordered and used these Spulen brand 40mm long bolts from USP Motorsports. The quality seems good. I haven't had any physical issues with them, but the chrome plating started to break down and rust after a few years. Impact drivers cause significant damage to the chrome coating on bolt heads. Most tire shops will use impact drivers. At home, I don't use impact drivers. Just use a tire wrench and a tire-specific torque wrench for tightening.

TROUBLESHOOTING
These are some of the issues I've had that I was able to repair.
Engine stalling when coming to a stop
Engine would cut off when warmed up and coming to a stop like at a light or stop sign. Letting the engine sit off for a few minutes before trying to restart would get it working. The problem continued to worsen to the point where it would take much longer to start again, and wouldn't start at all from cold.
The solution was to replace the crankshaft sensor in the engine. This permanently solved the problem.
Transmission won't shift above 2nd or 3rd gear.
The solution to this was to replace the solenoid valve PCB inside the transmission. The sensors had metal built up on the surface. Cleaning it may have worked, but the replacement part was not too expensive.
Coolant leaking from the driver's side of the engine.
This was a bad oil cooler block. Replacing it and the gasket fixed the problem.
Air Conditioner works intermittently
If the air conditioner works intermittently, and progressively gets worse to the point that it no longer works at all, the likely cause is bad solder joints on the relay on the AC control board. Watch this video to see how to fix that.
The old solder must be removed (using a solder sucker worked well). The first time I attempted this repair, I simply remelted the original solder, but this only worked for a short while. The second time I removed the old solder and used new solder. This appears to be a permanent repair.


Ball88 hôm bữa mình cũng tò mò bấm vào xem thử chứ chưa chơi gì đâu. Vừa vào cái thấy giao diện nhìn khá dễ chịu, không bị nhồi chữ hay màu mè quá nên lướt nhanh vẫn nắm được. Mình để ý họ chia nội dung theo từng khối rõ ràng, kiểu nhìn một phát là biết phần nào đang nói về cái gì, khỏi phải kéo lên kéo xuống tìm lại. Thanh menu đặt chỗ dễ thấy nữa, chuyển qua vài mục thấy mượt, không phải bấm lòng vòng. Nói chung mình chỉ xem tầm vài phút cho biết thôi mà vẫn nhớ được cách họ sắp xếp, nhất là mấy khung thông tin xếp gọn theo cột…
hitclub hôm bữa mình thấy mấy đứa bạn nhắc nên bấm vào nghía thử cho biết. Mình không vào để chơi gì đâu, chỉ tò mò xem trang họ làm có dễ đọc không. Lướt một vòng thấy giao diện chia theo từng khối nội dung khá rõ, kéo xuống không bị rối mắt, mấy mục quan trọng nằm ngay tầm nhìn nên đỡ phải tìm. Có một đoạn nói về kiểm định RNG viết gọn gàng, nhắc iTech Labs với GLI nên mình đọc qua cũng hiểu họ đang muốn trấn an chuyện ngẫu nhiên công bằng. Với lại phần bảo mật họ để riêng một ô, ghi SSL 256-bit kèm OTP hai lớp nhìn khá “đàng hoàng” chứ…
EE88 hôm bữa mình lướt thử vì thấy bạn bè nhắc, kiểu vào xem giao diện ra sao thôi. Vừa mở lên thấy trang làm khá “sạch”, nhìn hiện đại và chia khối nội dung rõ nên không bị ngợp chữ. Mình dùng điện thoại là chính, bấm qua lại giữa các mục thấy phản hồi nhanh, cuộn cũng mượt chứ không bị giật. Có một điểm mình để ý là họ trình bày thông tin theo dạng bảng cột khá gọn, nhìn cái là hiểu ngay chỗ nào là dữ liệu, chỗ nào là mô tả. Mấy phần nội dung cũng căn chỉnh vừa mắt, không phải zoom tới zoom lui để đọc. Nói chung lướt vài phút là…
56d apareceu pra mim esses dias e eu cliquei sem muita expectativa, só pra ver se era confuso igual vários por aí. Curti que a página não te joga um monte de coisa de uma vez: o texto vem bem dividido, com títulos bem claros e uns blocos que dá pra ir lendo no ritmo. O que mais me ajudou foi aquela parte com a linha do tempo em tabela, porque dá pra sacar a evolução da plataforma rapidinho sem precisar encarar um paredão de texto. Também vi que eles batem na tecla de regulamentação licenças e isso fica bem destacado no meio do conteúdo, não escondido em rodapé. No geral, achei bem “limpo” de navegar, com as informações principais…
https://tylebong88.com/ mình ghé thử cho biết vì thấy mấy ông bạn hay nói, chủ yếu xem trang bố cục ra sao thôi. Vừa vào là thấy tiêu đề kiểu “Chào Mừng Đến Website Của Chúng Tôi” đặt khá rõ, nên kéo xuống không bị rối hay phải đoán đang ở mục nào. Mình cũng để ý phần nổi bật có mấy khối dạng “Review / Visit” xếp gọn theo hàng, nhìn lướt là hiểu đây là chỗ tổng hợp đánh giá với thông tin khuyến mãi cơ bản. Không cần bấm nhiều vẫn nắm được trang đang tập trung vào cái gì, kiểu xem nhanh cũng ổn. Nói chung giao diện nhìn thoáng, chữ dễ đọc, và mấy block “Review…