Kickstarter Tip #3 - Using Animated Gifs
- Oct 6, 2017
- 3 min read
Updated: Jul 2
Animated Gifs are a great way to show potential backers how something appears or functions without having to watch the project video.

The trick to creating a good animated gif is to resize it to the Kickstarter image width (680px wide) and keep the file size to a minimum (5-10mb) so that it will load quickly.
Beware the 3 ring circus!
I've seen many campaigns with way too many animated gifs. Sometimes almost every image is an animated gif. This makes the page load very slowly, possibly turning away backers that have slow connections. It also creates too much motion and distraction once they are all loaded. It's like watching a 3 ring circus where you can't figure out what to focus on. Limit the use of animated gifs to allow the page to load quickly. Also there should be no more than one animated gif visible per "screen page" (meaning that you have to scroll before you see another animated gif, and the previous one will have scrolled off the page already).
How to create a GIF
The most efficient and best quality GIF creator that I have used is ezgif.com
At the Ezgif home page, click on "Video to GIF" on the top left of the menu bar.
Click "Resize"
Choose the video file. It's best if the video clip is already 680px wide.
Click "Upload video!"

Wait for video to upload. A new page will open with the uploaded video.
If the video is not already 680px wide, click "Resize" in the menu bar above the uploaded video.
Set the Width to 680.
Click "Resize Video!"

Scroll down below the "Resize Video" button and wait for video to be resized.
Click the "To GIF" Icon on the left side of the menu bar below the video.

11. Wait for the new page to open.
Double check that the video width is 680px
Make sure that "Size:" is set to "Original (Up to 800px)"
Adjust Frame Rate to your preference. 10 FPS is usually good enough. Higher frame rates will be smoother, but larger file size and take longer to load.
Click "Convert To GIF"

Scroll down below the "Convert To Gif!" button and wait for gif to be created.
Watch the Gif and see if you are satisfied with the results. If not, scroll up, adjust the settings, and reconvert.
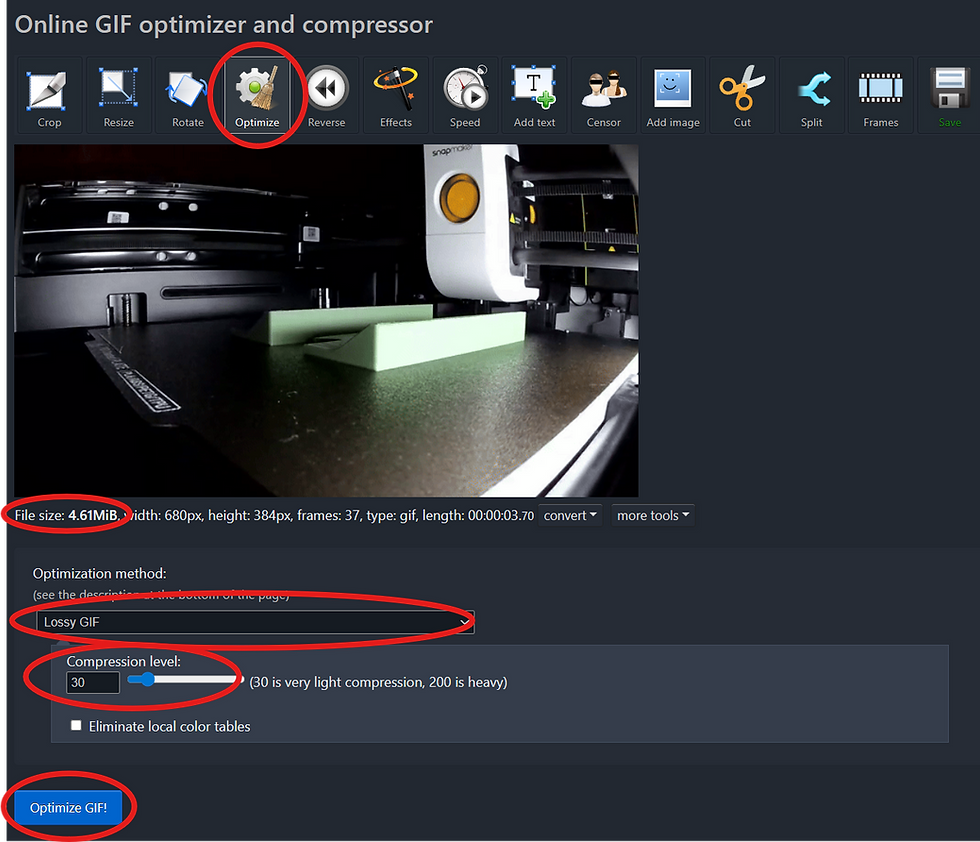
Click the "Optimize" Icon on the menu bar below the gif.

Wait for the new page to open.
Check the original File Size for reference.
For Optimization method, check "Lossy GIF"
For Compression Level, 30 provides a good balance of file size vs quality. For smaller file size, but worse quality, that can be increased to 100.
Click "Optimize GIF!"
Scroll down below the "Optimize GIF!" button and wait for new optimized GIF to be created.
Watch the GIF and see if you are satisfied with the quality. Check the file size. Try to achieve the smallest possible file size while retaining the desired quality. I aim for a sub 5 MB file size. If not, scroll up, adjust the settings, and reconvert.
Click the "Save" Icon on the right side of the menu bar below the gif.

Check your downloads folder for the saved file.
These are the original short instructions with less detail.
1. Upload the video clip that you want to convert. It's best if the video clip is already 680px wide. Select SIZE: "Original (up to 800px)"

2. If the GIF is not already 680px wide. Click on RESIZE, and set it to 680px wide. Make sure to set "If the aspect ratio doesn't match" to "Force original aspect ratio"

3. Click Optimize to reduce the file size. Set the optimization to about 20. This reduces the file size a lot without a significant loss of quality.


Comments