How To Block BAMBU STUDIO From Internet But Connect To 3D Printer Over LAN
- Dec 3, 2025
- 2 min read
BAMBU LABS provides information on how to configure their 3D printers to connect to BAMBU STUDIO over LAN only instead of using the cloud. That way you don't have to send files over the cloud, and don't need to login. However, BAMBU STUDIO is still connecting to it's servers, checking for updates and showing files that can be printed, so it's possible that the files you load into the studio are not secure.
After installing BAMBU STUDIO and setting up the 3D printer in LAN ONLY MODE and connecting to the BAMBU STUDIO, it's time to block BAMBU STUDIO from accessing the internet or anything other than the printer.
Make sure that the 3D printer is assigned a static IP address by the wireless router it is connected to.
Follow these steps to block BAMBU STUDIO's access to the Internet, but still allows connection to the 3D printer over LAN.
Open the Windows Defender Firewall with Advanced Security console.
Search for " Windows Defender Firewall with Advanced Security " in the Windows search bar.
Click Outbound Rules in the left pane.
Click New Rule in the right pane.
Select Custom and click Next.
Select "This Program Path", click Browse and choose the program (In this case it's Bambu Studio C:\ProgramFiles\Bambu Studio\bambu-studio.exe ) the rule will apply to and click Next.
Under Protocol Type, select Any and click Next.
Under "Which local IP addresses does this rule apply to?", select "These IP addresses:"
Click Add to specify the IP address you want to block. For example, if the 3D printer address is at 192.168.1.10, add a rule that blocks all IPs from 0.0.0.0 to 192.168.1.9, and add another that blocks all IPs from 192.168.1.11 to 255.255.255.255

Enter the IP address, click OK, and repeat for any other blocked IPs.
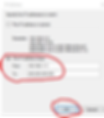
Under "Which remote IP addresses does this rule apply to?", select "These IP addresses:"
Click Add to specify the IP address you want to block. For example, if the 3D printer address is at 192.168.1.10, add a rule that blocks all IPs from 0.0.0.0 to 192.168.1.9, and add another that blocks all IPs from 192.168.1.11 to 255.255.255.255
Enter the IP address, click OK, and repeat for any other blocked IPs.
After adding the blocked IP(s), click Next.
Select Block the connection and click Next.
Select all the Profiles (Domain, Private, Public) and click Next.
Give the rule a name and click Finish.
Click "Inbound Rules" in the left pane of the Windows Defender Firewall with Advanced Security console and create a new rule with the same settings as above.
Restart Bambu studio if it was open.
If it worked, you'll see that MakerWorld is gone from the home page on Bambu Studio. It should now look like this:
Check under the DEVICE tab to make sure that you can still connect to the printers.
If something doesn't work, then the IP address ranges are wrong. Fix those so that it only allows the printer IP address.


